
Do you want to publish your book on Amazon Kindle but feel unsure about how to format it?
You are in the right place.
Formatting your book for Amazon Kindle (KDP) and print can feel tricky at first.
You must prepare two important files before you start: one for the inside pages and another for the cover. Getting these right makes sure readers see your book clearly on Kindle devices and printed copies.
In this easy-to-follow guide, I will explain exactly what to do, step by step.
Let’s get started and turn your finished manuscript into a great-looking book ready for Amazon.
Set Your Book Size and Margins
Choosing the correct book size and margins helps readers enjoy your book comfortably. The right settings give your content room to breathe, look professional, and be easy on the eyes.
Follow simple guidelines below to quickly select the correct trim size and margins for your book.
Choose the Best Trim Size
Trim size means the height and width of your book.
The popular size for Amazon KDP paperback and hardcover books measures 6 x 9 inches.
Other common sizes you might prefer include:
- 5 x 8 inches (ideal for shorter novels or quick reads)
- 5.5 x 8.5 inches (good for fiction or memoirs)
- 7 x 10 inches (perfect for workbooks, guides, or books with large images)
If unsure, go with 6 x 9 inches; readers find it easy to hold and read.
Set Margins the Right Way
Margins protect text and images from getting cut off after printing.
Recommended margins for Amazon books:
- Inside Margin: 0.75 inches (ensures text won’t get lost in binding)
- Outside Margin: 0.5 inches
- Top and Bottom Margins: 0.5 inches each
Books over 300 pages may require larger inside margins for comfortable reading.
Bleed or No Bleed?
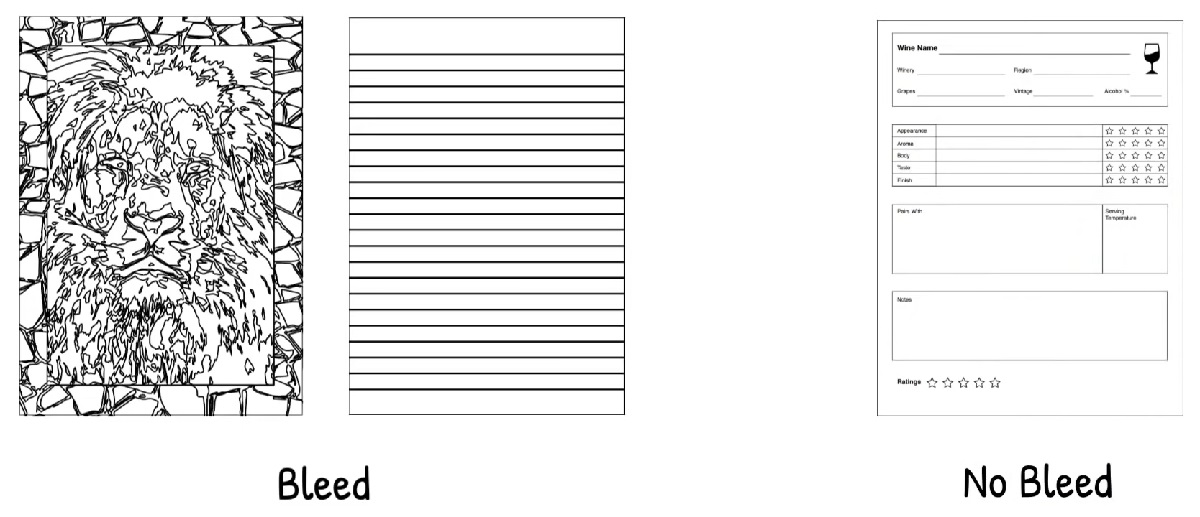
Bleed refers to images or colors running off the edge of a printed page.
If your book uses pictures or backgrounds touching the page edge, set the document with bleed.
Amazon recommends adding 0.125 inches of extra margin area for books with bleed on all edges.
If your book has text only, you don’t need to bleed.
Quick Tips for Easy Formatting
- Decide your trim size first before formatting content.
- Keep margins consistent throughout your book.
- Always preview your book after formatting to ensure text appears correctly within the margins.
Create Front Matter and Back Matter
Front matter and back matter organize your book into clear sections readers easily recognize.
The front matter includes essential information readers see before main content begins.
Back matter offers extra information readers see after finishing the main content.
Organize your book professionally by following these clear instructions:
What to Include in Front Matter
Front matter pages usually follow this order.
Title Page
Clearly shows your book title, subtitle (optional), and author name. Center this information neatly on one page.
Copyright Page
Provides legal details about your book.
- Copyright © Year
- Your author name
- “All Rights Reserved”
- ISBN number (optional but recommended)
Dedication Page (optional)
Write a short dedication to someone special if you wish.
Table of Contents
List each chapter and main sections, with corresponding page numbers.
Preface or Foreword (optional)
Brief introduction or background details about your book.
What to Include in Back Matter
Back matter pages commonly include:
- About the Author Page: Briefly introduce yourself, your background, interests, and other books you’ve written.
- Bibliography or Resources Page (optional): List useful resources or references used in your book.
- Acknowledgments (optional): Thank individuals who helped you write, edit, or publish your book.
- Call to Action or Author Website (optional): Encourage readers to connect or learn more through your website or social media.
Tips for Professional Front and Back Matter
- Keep each element on separate pages for clarity.
- Start each new section on a right-hand (odd-numbered) page.
- Maintain consistent formatting (font, size, spacing) across these pages.
Add Chapter Titles and a Table of Contents
Clear chapter titles and a proper Table of Contents help readers quickly understand your book’s structure. They also make your book appear well-organized and professional. Make your book easy to navigate by following the simple steps below.
Formatting Chapter Titles Correctly
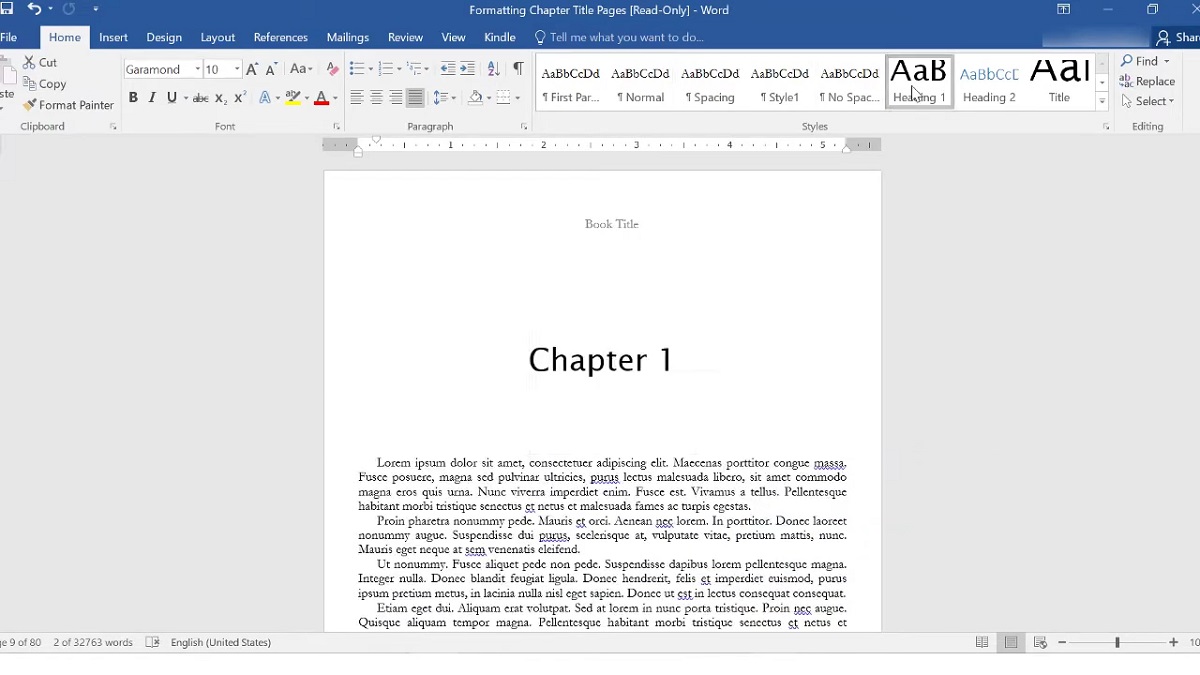
- Use the “Heading 1” style in Microsoft Word for each chapter title.
- Center chapter titles clearly at the top of a new page.
- Keep chapter title formatting consistent throughout the entire book.
Creating Your Table of Contents (TOC)
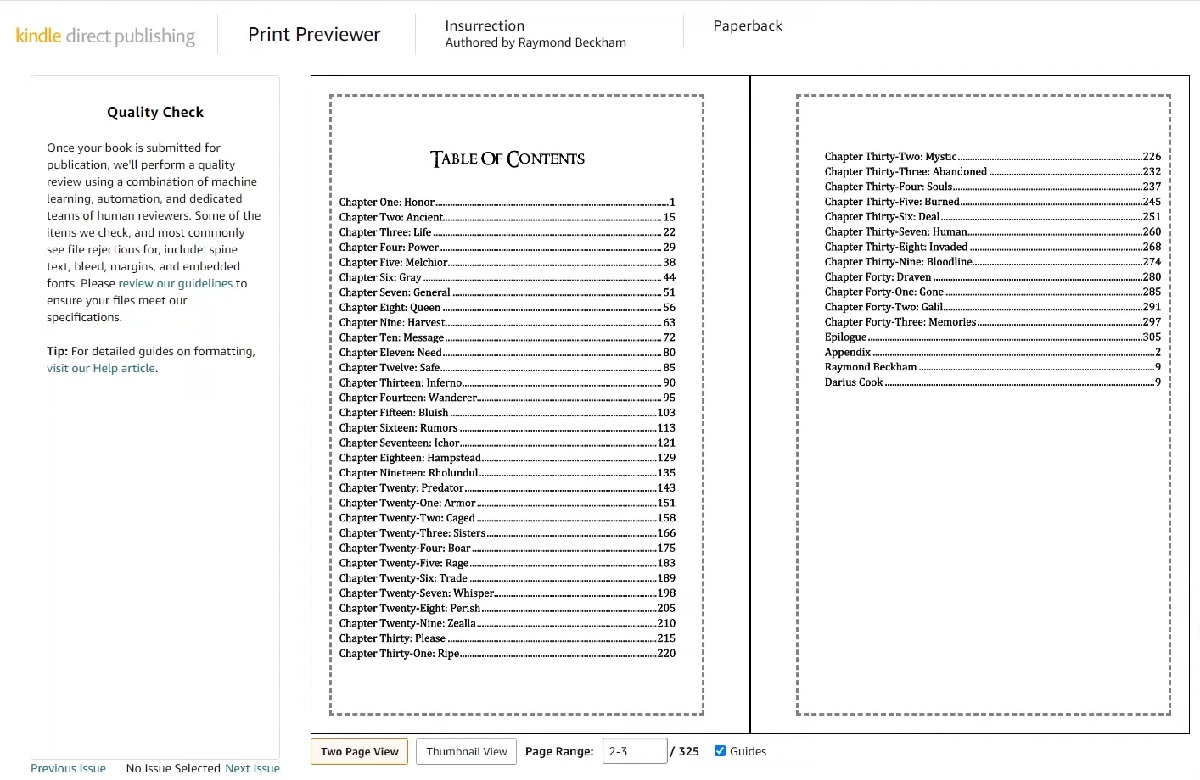
- Word creates a Table of Contents automatically if you use Heading styles.
- Click on “References,” then select “Table of Contents.”
- Choose a simple format without fancy designs or unnecessary details.
- Update the Table of Contents after finishing your book content or making changes:
- Right-click on your TOC.
- Select “Update Field.”
- Choose “Update entire table.”
Essential Tips for TOC and Chapters
- Always insert page breaks after each chapter title to avoid formatting errors.
- Never manually type your Table of Contents; use Word’s automatic feature instead.
- Double-check your TOC page numbers against actual chapters.
Insert Images Clearly
Images enhance your content but require special attention when formatting your book for Amazon Kindle or print.
Place and format images correctly to avoid problems in your final printed book or eBook.
Guidelines for Image Formatting
- Always insert images directly into your manuscript file.
- Use JPEG (.jpg) or PNG (.png) formats to ensure high quality.
- Recommended resolution: 300 dpi (dots per inch) for clear, sharp images in print.
- Avoid placing images too close to page margins to prevent cropping after printing.
Image Size and Position
- Resize images before placing them into your manuscript.
- Keep images centered or aligned neatly with text.
- Never stretch or distort images to fit your page.
Tips for Using Images Successfully
- Avoid using text boxes or shapes around images; convert these into simple images instead.
- Insert captions clearly below images to enhance reader understanding (optional).
- Always preview how images appear using Kindle Previewer or by reviewing PDF files closely.
Design an Amazon-Compatible Book Cover
Your book cover attracts readers and represents your book’s content.
Follow clear guidelines to create an attractive and professional cover that meets Amazon KDP standards.
Cover Creator Tool
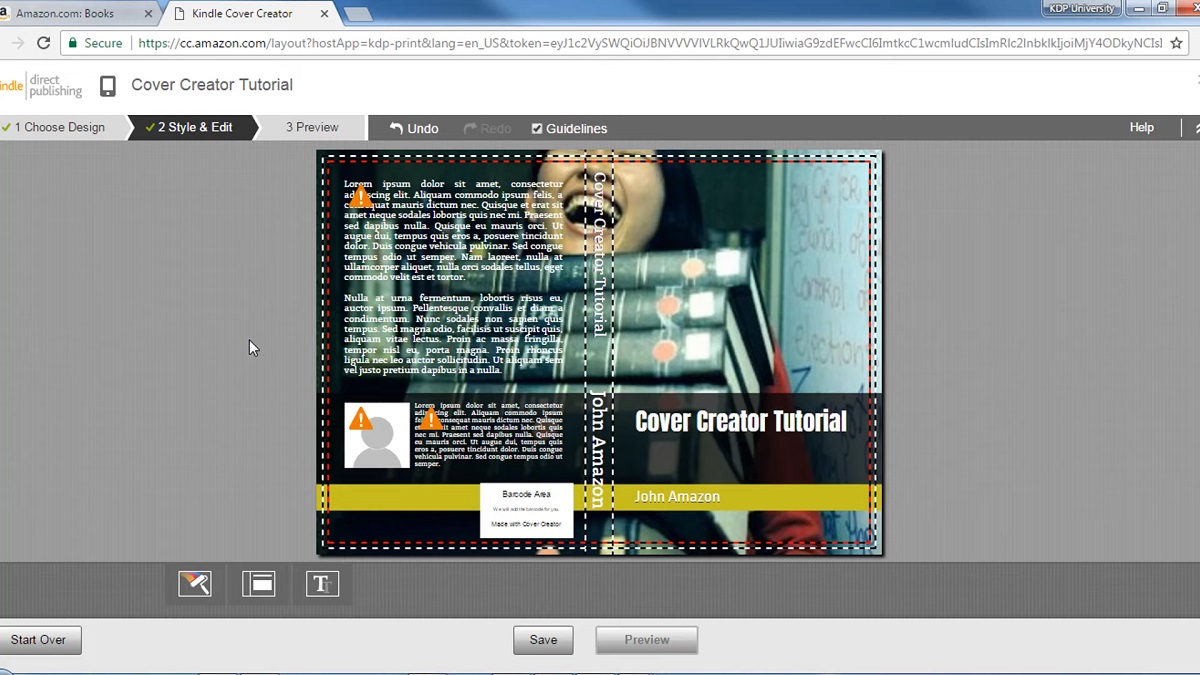
- Amazon provides a free Cover Creator tool directly in your KDP account.
- Choose from multiple professional layouts.
- Easily upload your own images or select Amazon’s provided backgrounds.
- Ideal if you want quick, professional-looking results without extra software.
Download a Cover Template
- Amazon offers free downloadable cover templates.
- Choose your exact trim size, page count, and paper type.
- Templates clearly mark safe areas, margins, and spine.
- Edit the template in graphic software such as Adobe Illustrator or Photoshop.
Create Your Own Cover from Scratch
- Use graphic design software to build your unique cover.
- Calculate correct dimensions using Amazon’s KDP Cover Calculator.
- Set resolution at 300 dpi for high-quality results.
- Clearly display title, author name, and subtitle (if used).
Helpful Cover Design Tips
- Ensure all text remains clear and readable.
- Avoid cluttered designs or excessive detail.
- Preview cover at different sizes, small thumbnails must stay clear.
Use Kindle Create to Simplify Format
Kindle Create makes formatting your manuscript quick, easy, and stress-free. Use Kindle Create if your book mostly has text and simple layouts without complex formatting.
When to Use Kindle Create
- Ideal for novels, memoirs, short stories, and simple nonfiction books.
- Perfect if you have limited formatting experience and need simplicity.
- Avoid Kindle Create if your manuscript contains complex tables or detailed footnotes.
Easy Steps to Use Kindle Create
- Download Kindle Create from Amazon (free for PC and Mac).
- Import your completed Word document into Kindle Create.
- Choose a theme matching your book style.
- Easily format chapter titles, page breaks, and basic design elements within the tool.
Preview Your Book Easily
- Kindle Create includes a built-in previewer.
- Quickly check how your book appears on Kindle devices, tablets, or phones.
- Instantly adjust and correct formatting if needed before finalizing your file.
Exporting and Uploading Kindle Create Files
- Once formatting finishes, export your file in Kindle Package Format (KPF).
- Upload this file directly to your Amazon KDP Bookshelf.
Export and Save Files Correctly
Correctly exporting your book files ensures smooth uploading to Amazon KDP.
Saving files in the wrong format can cause delays or formatting errors.
Carefully follow steps below for error-free results.
Export Manuscript as PDF
- In Word, select “File,” then “Save As.”
- Choose PDF format.
- Select option “Best for Printing.”
- Verify PDF carefully after saving.
Export Kindle (eBook) Manuscript
- Save your manuscript in DOC or DOCX format for Kindle eBooks.
- Avoid PDFs for Kindle eBooks to maintain text flexibility on devices.
- Upload DOC/DOCX directly or use Kindle Create to convert files into Kindle Package Format (KPF).
Cover File Export
- Export your cover as a high-resolution PDF (300 dpi).
- Verify dimensions and quality before uploading to KDP.
- Use Amazon’s cover template or KDP Cover Calculator to confirm exact sizes.
Preview Your Book on Kindle
Always preview your book before uploading to Amazon KDP.
Checking your manuscript and cover helps you find mistakes, formatting issues, or layout problems early.
Previewing Your eBook
- Download Amazon’s free Kindle Previewer software.
- Upload your manuscript file (DOC, DOCX, or KPF).
- View how your book looks on Kindle e-readers, tablets, and smartphones.
- Fix any formatting issues discovered immediately.
Previewing Your Paperback or Hardcover
- After exporting a print-ready PDF, check carefully on your computer screen.
- Zoom in closely, verifying page margins, chapter openings, images, headers, and page numbers.
- Confirm all important pages start correctly on odd-numbered (right-facing) pages.
Upload Your Files to Amazon
Once formatting and previewing finish, you must upload your files directly to Amazon KDP.
The uploading process takes only a few straightforward steps:
Steps to Upload Manuscript and Cover
- Log into your KDP account and navigate to “Bookshelf.”
- Select “Create Paperback,” “Create Hardcover,” or “Create eBook.”
- Complete book details (title, author name, description, keywords, categories).
- Upload your manuscript file (PDF for print, DOC/DOCX/KPF for Kindle).
- Upload your PDF cover file separately (for print versions).
Verify Uploaded Files with Online Previewer
- Amazon provides an Online Previewer after uploading your files.
- Confirm again all pages, images, and formatting appear correctly.
- Amazon automatically checks files for common errors and displays notifications if needed.
Set Pricing and Distribution
- Enter your book price clearly.
- Choose distribution channels (Amazon or Expanded Distribution for print).
- Confirm your rights, territories, and publishing options.
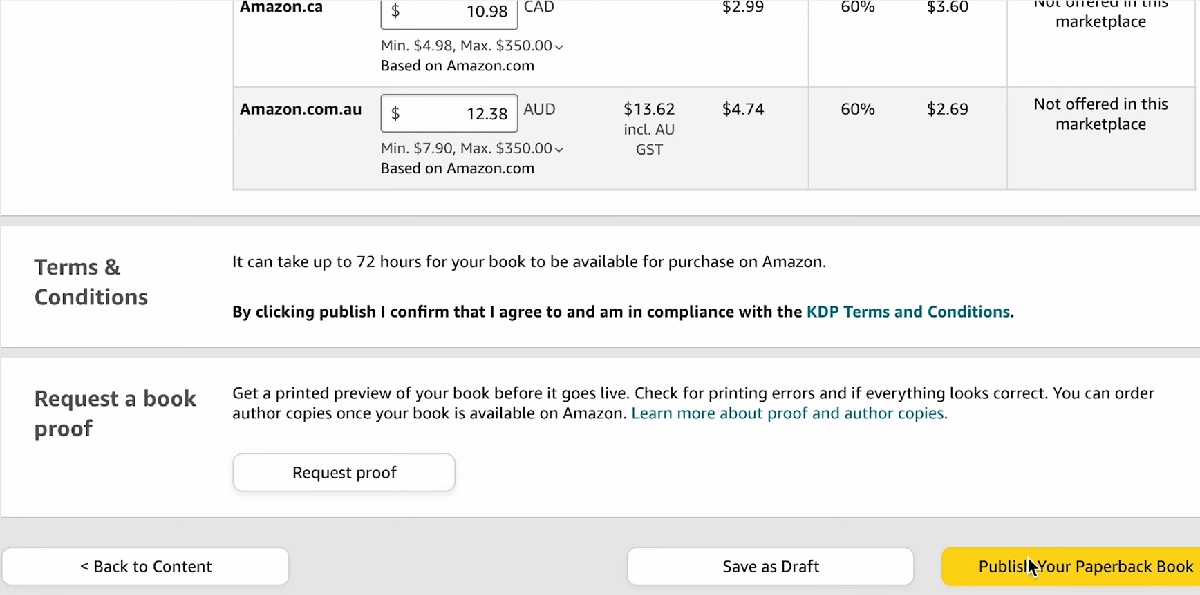
Perform Final Checks Before Publishing
- Ensure book title, author name, and metadata match your manuscript and cover exactly.
- Verify your ISBN if you have one (optional for Kindle).
- Confirm your cover appears clear, sharp, and error-free.
- Check your pricing and distribution settings clearly match your strategy.
Last Words
You now have everything needed to format your book clearly for Amazon Kindle and print.
Careful formatting, clear steps, and proper checks ensure your readers enjoy the best possible experience with your book.
Follow guidelines closely, and you can confidently publish your book without stress.